Jul 30, 2010

Comparison: Benefit's Erase Paste vs Boi-ing Concealer


Back when I first started Beauty Babble, I wrote a review about Benefit's Erase Paste under-eye concealer and how much I was enjoying it. Since then, I have tried using it on other parts of my face, as the packaging clearly states that it is a camouflage for eyes and face, but had dastardly results (bad coverage, no staying power). Thus, a few weeks ago when I was at Sephora during a special Benefit event, I approached one of the makeup artists to get her suggestions as to why Erase Paste was starting to fail me.

The woman announced that Erase Paste isn't actually meant to be used anywhere except under the eyes (so why the packaging states it for eyes and face boggles my mind) because it has a brightening complex that can actually make blemishes more visible. Instead, she said I needed their other concealing product, Boi-ing, for the rest of my face because it was a full-coverage, matte concealer. After trying the product, I liked the coverage, so I decided to pick it up and give it a try at home.

Then one day, I forgot to throw my Erase Paste into my morning makeup bag and thus, with only my Boi-ing with me, decided to try using it under my eyes, and lo and behold, the coverage was better than the Erase Paste, and this product worked all over my face, not just under my eyes. This got me to thinking: why would anyone need both of these products, and furthermore, what does Erase Paste really offer that Boi-ing doesn't?

Here's how these products are different:
- The consistency: Erase Paste is VERY thick and creamy. A very little bit truly does go a long way, and if you use too much, you'll give yourself a very caked, tacky finish. Boi-ing is creamy to the touch initially, but blends out into a powder-like consistency that is a bit more dry. I find that this consistency is easier to blend and sets better than the Erase Paste.
- The coloring: Despite both products only coming in three numbered shades, the colors are actually not the same across products. I have the 01 Fair for both, and notice that the Erase Paste has more of a peach undertone, whereas the Boi-ing is more neutral/yellow. I think this is what makes Boi-ing overall a more versatile product -- the neutral undertones make it easier to blend all over your face, whereas the peach undertone can look off when applied over red blemishes.
- Illuminating properties: After blending, Erase Paste definitely leaves a more dewy finish, with a hint of a sheen, whereas Boi-ing creates a more matte finish.
- Packaging: Not a huge point, but Erase Paste is packaged in a small tub and comes with a scoop to get the product out (which I think is useless, I just use my brush tip) whereas Boi-ing is packaged in a flat, round, powder-like container.
- Staying Power: While neither is a miracle worker, the Boi-ing stays put longer than the Erase Paste, even when the latter is combined with the company's Stay Don't Stray primer for eyes and undereyes.

Here's how these products are similar:
- Price points: Initially, it would seem like Boi-ing was more cost effective at $18 versus $26 for the Erase Paste, but ounce for ounce, they're nearly the exact same price (you get .1 oz of Boi-ing versus .15 oz of Erase Paste, which makes 1.5 oz of Boi-ing worth $27).
- The amount you need to get the job done. Both are "less is more" kind of products.
- The best way to apply them: Both go on most smoothly when applied with a fluffy blending brush, such as the SS 217. Denser concealer brushes grab too much product and apply it too thickly.

Overall, I feel sort of ripped off now! Although I was excited about my Erase Paste when I first got it, the poor coverage on the rest of my face, combined with the lack of staying power left me wanting more. And now that I've found another product from the same company that can cover my undereye circles better, AND work for my blemishes, I feel even more jipped. In the end, while I'll use both so that neither go to waste, I probably wouldn't re-buy the Erase Paste, nor would I recommend it unless you have gorgeous skin apart from dark circles and thus need a concealer only for your undereyes. Otherwise, you'll be buying two concealers just the same and could probably find an "all-in-one" variety to ease your budget!

Both Erase Paste and Boi-ing can be purchased online at the Benefit web site: http://www.benefitcosmetics.com/, at Sephora -- http://www.sephora.com/ -- or at ULTA -- http://www.ulta.com/. I hope this was helpful!

Jul 23, 2010

My first E.L.F. Cosmetics Purchase!


A couple of weeks ago, my lovely friend Twitter informed me that ELF was having a sale where their entire Web site was 60% off. I had heard quite a bit about ELF, particularly that their "higher quality" Studio and Minerals lines were worth a peak, so I decided to check out the site and see if I could find anything that I liked. Now, I had heard several times that ELF was the site to go to for dirt-cheap makeup, but even I was shocked to see that most of their items were $5 or less. Of course, at this point I couldn't resist trying a few things! Since I've been on a bit of an eyeshadow binge lately, I steered clear of the eyes section and instead focused on lips and face. In total, I purchased 12 items and received a 13th for free for referring some friends -- and my whole order came to less than $30 because of the sale! You can't even get prices that good at the drugstore.

LIPS
(Barely Bitten and Nicely Nude)
For lips, I ordered 7 shades from the Minerals collection (they have 16 total), since the Studio line only produces glosses, and I've got a million of those already. As you can see from the top picture, the lipsticks are packaged in a white cardboard box with the shade listed by color on the front. Initially, I thought the packaging looked pretty cheapy, but once I opened up the box, I was pleasantly surprised to find an angular, heavy plastic black case with the ELF logo engraved on the top and side. The packaging compares to professional brands, and in my opinion, is nicer than drugstore brands like Maybelline, Cover Girl and Rimmel.

The colors I picked up were (from left to right) Party Pink, Pouty Petal, Cheerful Cherry, Runway Pink, Fiery Fuschia, Barely Bitten and Nicely Nude, which are all in the pink/berry/red family (unfortunately the colors in real life aren't entirely true to what my camera is picking up...everything is a bit more pink, whereas the camera is giving things an orange/coral tint). This relates to my one complaint about these products: the colors on the Web site really aren't true to the colors in life, so it's a bit of a blind order. Also, a lot of the colors are quite similar on, even though they look different in the tube/swatched.
(Party Pink, Pouty Petal and Cheerful Cherry)

I haven't yet had the opportunity to wear all of these shades, but I did wear Pouty Petal yesterday and found it to be quite moisturizing, albeit a bit sheer (all of the other shades are substantially more opaque). The staying power was probably about average -- I eat and drink a lot throughout the day, so in general, lipsticks don't tend to last very long on me. Overall, from a first impression standpoint, I don't think ANYONE would guess in a blind test that this lipstick cost $5, while my MAC lipsticks cost $14!

FACE
For face, I picked up three blushes from the Studio line (which retail for $3 a piece at full price): from left to right, Blushing Rose, Mellow Mauve and Tickled Pink. Of the three, only Blushing Rose has shimmer. The packaging on these items is even more impressive than the lipsticks -- the case is a really high-quality, hard black plastic with a little clear window so you can see what color is inside (the casing is similar to NARS, but with a smooth finish). The products themselves are SUPER creamy for a powder blush -- I actually thought that I accidentally bought a cream blush when I swatched Tickled Pink for the first time because it felt SO silky to the touch (in truth, when you apply them, they are powders, just very soft ones!).

Then I also got the blush and contouring kit, which was said to be a dupe for NARS Orgasm blush and Laguna bronzer. This is the one item that I think I regret buying (but thankfully I only paid $1.50 for it!). Although I think the blush is pretty, it's very sparkly, and the bronzer is much too muddy for my skin tone (on me, it looks like I smeared poo on my face unless I use a very light hand and blend really well...for that much work, I'd much prefer to grab my Too Faced Sun Bunny bronzer and be done with it!). If you're slightly less fair-skinned than me, this might be a better match!

As I mentioned earlier, ELF also included a free gift in my purchase since I referred some friends after checkout. I was pleasantly surprised to see that the free gift was one of their famous Shimmering Facial Whips, which I had wanted to try out, but thought I'd leave for a future purchase. The shade they sent me is citrus, which looks more bronze in the tube, but rubs out into a pinky highlight shade. Word on the street was that this product was a dupe for Benefit's High Beam, and I think, on a color perspective, that's true. On a consistency perspective, the Shimmering Facial Whip is much thicker of a product, whereas High Beam is liquidy. For this reason, you need less product of the Whip to achieve the same result with High Beam. The best part is that it only costs $1 and it comes in EIGHT different shades!

The final product that I tried was one of their nail polishes in the color Passion Pink (retails for $1). Now here we have another instance of ELF misrepresenting their colors on the site. If you look at the picture they post, Passion Pink is a bright, hot pink color (I've copied the photo, below at left). Now compare that to the photo I took of the bottle of polish with my painted fingernails: the color is a true coral! It's so coral that I would consider it a near dupe for Essie's Cute as a Button, which I did a NOTD with not that long ago. As a matter of fact, when I was browsing the ELF site this morning preparing to make a second order (they are offering a promotion right now where you get 10 free full-size mineral eyeshadows of your choice, which is a $30 value, with a $25 purchase), I was so convinced that I had purchased the Mango Madness nail polish that I almost ordered Passion Pink again. Thank goodness I caught myself!


And that completed my first ELF order. Overall, I think you receive a much higher value than the price you pay, so I'd definitely suggest trying out their line if you're looking for high-quality budget makeup. Just remember that their site doesn't always portray the colors of their products correctly -- it makes it a bit of a guessing game, but for the price, I think it's worth the risk!

ELF cosmetics can be purchased online through their Web site: http://www.eyeslipsface.com/.

Jul 21, 2010

Birthday Haul Part 1: Sephora - Featuring Too Faced, Nars, Boscia and more!

As you all know, it was my birthday last Sunday, so naturally, I couldn't help but go out and spend some of my birthday money on the latest and greatest in the land of makeup.... Truth be told, I went into Sephora with the sole intention of picking up my free gift and running out the door, only that didn't happen! Of course, one look and I fell in love with a million other products and became unable to resist spending way more than I meant to. Guilty as charged! Oh well, at least I can blame it on a birthday spending bash! ;)

Here's the awesome stuff I picked up (plus some mini first impression-style reviews)!

Lately, I have been really obsessed with kits -- I feel like you get more bang for your buck and you can try a whole range of products without feeling too guilty about the prices that go along with the full sizes. The first thing I was immediately drawn to was the Too Faced "Walk of Shame" value set, which was originally $38, but on sale for $19! This is a kit I had been eyeing for a while, so when I saw that it was 50% off, I couldn't resist! Here's what you get: 

FULL SIZE Too Faced Shadow Insurance (retails for about $17 on it's own!)
Full size Lip of Luxury lipstick in Totally Nude
Mini Primed and Poreless Face Primer
Compact featuring Sun Bunny bronzer and two neutral eyeshadows in Silk Teddy and Totally Toasted
Small packet of chai flavored mints
Pink travel toothbrush
Adorable black and pink satin makeup case

I haven't tried all of the products yet, but will certainly do a full review once I've had the chance to form some opinions. So far, I'm totally impressed that this set features a full size TFSI (which I wasn't at all expecting), because for $17 on it's own, it makes the whole kit worth even the full price of $38 (if you subtract out the TFSI, you're still getting a bronzer, two shadows, a primer, a lipstick, etc. for $21, which is an amazing deal).

From a first-impression standpoint, I already know that I don't like the lipstick. Although the packaging is adorable, it's much too brown for my skintone/features. I also thought the mints tasted GROSS (but there were only 3 included, so I didn't feel too guilty about tossing them out). I haven't tried the shadows/primer yet, but I already own Sun Bunny from the Too Faced "The Bronzed and the Beautiful" kit and know I like that, so I am a happy camper!

The second kit that I bought was the NARS "So Famous" set, which includes a full-size Deep Throat blush, a mini Orgasm multiple and a Bettina Velvet Matte Lip Pencil. The set was a bit more expensive at $44 for the three items, but if you break it down, the full-size blush is $26 on it's own, a full-size multiple is $38 (the one you get in the kit is about 1/3 the size, so figure $13 for that) and the lip pencil, which is also full-size is $24. So for $44, you're getting a $63 or so value.

From a first-impression standpoint, I LOVE the blush. It's a beautiful color with a silky smooth application and definitely seems like it would be a good fit for both light and dark complexions. The multiple I haven't tried yet, but I do think the color appears to be pretty for a cream blush. I'm not exactly sure how I'd use this on my eyes or lips (I guess I could use a lip brush to turn this into a lipstick), but I will certainly try it and see how it goes! The lip pencil, unfortunately, I hate! As a big fan of lipgloss, I really don't understand the "matte" lip look, and that is exactly what this pencil delivers. The color is also, once again, too nude and muted for my skintone. Two out of three isn't bad, but I do sort of wish I could return the lip pencil or at least swap it out for a more flattering color!

The third and final kit that I picked up was the Boscia Clear Complexion kit for $48. I first tried this line a few weeks ago at ULTA (received some samples) and really liked how gentle it was on my skin (the toner didn't sting at all!). I also liked the fact that the products don't have added fragrances/colors -- a big plus for someone with sensitive skin like me! I've been using Clinique's 3-Step for years, and while I like it, it isn't formulated to treat acne, so I decided to give this line a try to see if it could clear up my skin. The kit comes with the Clear Complexion Cleanser, the Clear Complexion Tonic, the Clear Complexion Treatment and the Oil-Free Daily Hydration SPF 15. In total, you get a 30-day supply. I haven't actually used any of the products yet, as I want to finish off my Clinique first, but look for a review in the next month or so!

That's it for part 1 of my birthady haul! Stay tuned for part 2 (MAC) tomorrow! :)

Jul 20, 2010

Review: Bare Minerals Foundation (Original Formula)


I was first introduced to the Bare Minerals line when the CEO and Founder Leslie Blodgett came to my graduate school to speak at our Dynamic Women in Business conference. As part of the goody bag, we all got a full size Rare Minerals Moisturizer and Buxom Lash Mascara, and if you went for a "makeunder" in one of the conference rooms, you also got a sample of their immensely popular foundation, plus a mini kabuki brush. At the time, I wasn't using a foundation at all, so I fell in love with Bare Minerals because it felt light and airy, and was a really good color match for my skin tone. Needless to say, after I finished up my sample, I quickly visited the Bare Escentuals store in my local mall to pick up a full-size foundation.

It's been over a year and a half since I bought that full-size foundation and I still have a lot of it left, likely because my opinion of the product has changed a bit since I've started experimenting with other brands of foundations.

First, let me start with what I DO like about the product. Obviously, it's cheaper than many high-end foundations at $25 for the large size, and the color range is pretty wide with 20 cool, warm and neutral shades to choose from (I am Fairly Light, which is their light/neutral shade). I also definitely think that this product can achieve multiple levels of coverage, depending on what you are looking for. If you use just a tiny dusting of the powder, you can get very sheer coverage that simply evens out skintone, whereas if you swirl your brush in a larger amount, you can get a nearly full-coverage face (I say nearly full coverage because I always still need concealer to cover my red pimples/blemishes). Finally, I like the fact that it has SPF 15, but doesn't have the greasy feel or smell of sunscreen, which some liquid foundations can have.

Now, here's what confuses me about the product: apparently the "original" formula, which is what I have, is supposed to be the "luminous" formula. Ummm...sorry Leslie, but there is absolutely nothing luminous about this powder foundation -- it creates a 100%, completely matte look no matter how little you use. As a matter of fact, that's one of my DISLIKES about the product. As a normal-to-dry-skin type, I sometimes find this foundation to be too cakey for my complexion, and would recommend the "original" formula more for oily skin types. It has absolutely no shimmer, glitter or sheen to it -- it's just a matte foundation/powder. This all makes me wonder what happens when you use the "matte" formula that they just came out with! I honestly can't imagine anything being MORE matte than what I already use.

A few more things that I dislike. As with any mineral product, things can get VERY messy, even if you're trying to be meticulous. Since you're dumping product into the lid of the packaging to swirl your brush in, I find it almost inevitable that I pour too much in and then have to maneuver the leftover product back into the pot so I don't waste it. I also inevitably get powder all over the counter as I'm swirling and tapping off the excess.

The final thing that I dislike is the company's claim that this powder feels like a silky-smooth cream. Uh, no, it doesn't. It feels totally like a powder. Granted, I don't MIND powders, so the fact itself doesn't bother me, but I just get really annoyed when companies make claims that are so obviously far from the truth!

Overall, I may or may not re-buy this product once I finish it. There ARE several things that I like about it, and I find it to be particularly good for those on-the-go days when you want to throw something on quickly and easily. However, I'd just be aware that despite what the marketing materials say, this is truly a POWDER and it does what any powder would: mattify.

To Recap:

Pros:
- An affordable price point among higher-end foundations at $25 for a huge pot of product
- Color range is quite wide with 20 shades to choose from (cool, warm and neutral tones)
- The product allows you to achieve multiple levels of coverage, depending on your wants/needs
- If you have oily skin, this would be a great solution for you!

Cons:
- Can be quite drying for any skin type other than oily
- It's messy!
- The company makes claims about the product that are NOT true (i.e. that it feels like a cream or that it provides a luminous finish)

Jul 18, 2010

Beauty Break: It's My Birthday!


Sorry I've been a bit MIA from Beauty Babble this week -- I've been busy celebrating my 26th birthday with family and friends! I've been doing lots of hauling for my special day, and have received some great beauty and fashion gifts, so keep your eyes peeled for some new blog posts in the next week. In the meantime, I am off to keep the celebration going for one more day! (And P-S: The beautiful card you see above was hand-painted by my father who is an amazingly talented artist!)

Jul 13, 2010

Summer Lovin with Urban Decay (Featuring UD's Summer of Love kit)


As an eyeshadow junkie, Urban Decay is fast becoming one of my favorite makeup brands. I love, love, love their adorable packaging (they are second only to Benefit in my opinion), I think their eyeshadow colors are gorgeous and I swear by their Primer Potion. This adoration brings me to the subject of this post! Urban Decay's Summer of Love palette has elevated itself to top placement on my makeup counter as my summer go-to shadow box. Although it only comes with four colors, they somehow manage to make for endless looks, whether I'm going for a beachy nude look or a dramatic shimmer at night.


Here's what you get in the kit:

- Four eyeshadows in Flash (a purple with a metallic finish, but no glitter), Maui Wowie (a shimmery taupe/olive green), Chopper (a sparkly peachy nude) and Smog (a metallic, glitter-free bronze).
- A mini UD Primer Potion in Sin
- A mini 24/7 Glide-On Eye Pencil in Bourbon, which is a dark reddish brown

...All of this is packaged in an adorable, purse-friendly magnetic palette with a mirror!


Flash, Maui Wowie, Chopper and Smog

At this point you might be wondering: What is it that makes me love this palette so much? Firstly, let me say that if you have used any Urban Decay eyeshadows before, you will know what I mean when I say they are heavenly. The colors are so rich and look beautiful whether you choose to pack them on at their full pigmentation, or blend them out for a subtle, natural glow. Plus, the shadows are silky smooth, easy to apply and don't have excess fall out.

The other thing I love about this palette is its portability and color selection. You could easily pair up Chopper and Smog for a natural work look, pop this palette into your purse and add Flash in your crease to brighten the color for a dinner out, or just pop Maui Wowie onto the highlight to wake up your face throughout the day. Each shade is so complementary to the others that you can create looks with any two, three or all four shades at once!

The ONE thing I don't love about this product is the price -- $29 -- but I rationalize (one of my strengths, hehe) by breaking it down and considering that I am getting six products for that price, which makes each around $5 (and then I compare that to the $14.50 that MAC charges for a single shadow and I feel better!). At the end of the day, if you ask me, it feels like you're getting a pretty good bang for your buck!

The Urban Decay Summer of Love palette is just one of many cute sets and kits that Urban Decay sells (I'm itching for their NAKED palette, which is part of the new fall collection!). Check out their Web site for more -- www.urbandecay.com -- or look for their products at Sephora (www.sephora.com) and ULTA (www.ulta.com).

Now it's your turn to spill: What's your favorite Urban Decay product?

Review: NYX Jumbo Eye Pencils


If you read my recent mini-NYX haul, you'll know that I have just begun to try products by this brand, and I began my journey in the "eye" section since shadows/liners/mascaras are my favorites among makeup products. Unfortunately, despite the hype surrounding this brand, I wound up disliking a good portion of what I got -- the eyebrow kit was too dark for me, the glitter creams were too chunky and dry, and even the eyeshadows (which I have tried since my haul) failed to impress with their ultra-powdery formulation that makes for a TON of fall out (although to their credit I find this powdery-ness to be true only amongst their trio and palette shadows -- for some reason, I didn't have the same problem with their single shadows!).

Despite my general disappointment with what I've tried so far, there is one series of products that NYX has created that I find to be really original and worth purchasing, and those are the Jumbo Eye Pencils. Why do I like them? First and foremost, I've never seen anything like them from a drugstore brand, and the closest thing I've ever used from a department store is the Clinique Chubby Stick, which was a lipstick from way back when. Where else can you get an eye shadow and eye liner in one that is shaped like a chubby pencil, can be sharpened (so it's ultra sanitary) and is easy to store because it's long and thin?

Then we get to the color range. One word: AWESOME! Whether you prefer neutral or bright shades, NYX has something for you with more than 25 colors (pink, purple, blue, green, red, orange, yellow, brown, bronze, white, silver, gold, gray, cream, and more) to choose from. (P-S: the colors on the NYX site are TOTALLY off, so if you are going to order, I'd use another Web site, or just go see them in person at your local ULTA or drugstore.) On top of it all, the pigmentation is awesome and is easily buildable to an opaque shade. Right now, I own six shades: Yogurt, Cottage Cheese, Strawberry Milk, Iced Mocha, Dark Brown and Oyster, and my favorite is Iced Mocha by far.

With and without flash. From L to R: Cottage Cheese, Iced Mocha, Oyster,
Yogurt, Strawberry Milk and Dark Brown

As far as wearability, I've tried the Jumbo Eye Pencils as eyeshadow bases, shadows by themselves, and as liners, and I think each has its pros and cons. As an eyeshadow base, you definitely achieve brighter shadows when you use complimentary shades (for example, I applied Pink Venus by MAC over Oyster and it made the pink shadow really pop!), however, I find them to be too thick to make blending with a brush easy (your shadow brush winds up getting all goopy from the creamy consistency!). As shadows by themselves, I always use an eyeshadow primer, so I haven't noticed any problems with creasing, and I find the colors to be quick and easy to apply because you can just rub them on, blend with your finger and you're good to go! Their third use as an eyeliner definitely makes for a pretty pop of color, but I find that the product fades fast on the waterline and is a bit too thick to make for an efficient upper lash liner.

To Recap:

Pros:
- Wide color range including neutrals and brights means there is something for everyone
- The pencil eyeshadow + eyeliner in one format is unique to NYX and makes for easy storage and a product that stays sanitary for longer than potted cream shadows
- At $4, they are very affordable, which makes it easy to build up your collection of shades
- Pigmentation is great and very buildable

Cons:
- A bit too thick to be used as an eyeshadow base
- Wears off very fast when used as an eyeliner on the water line
- Thick tip makes it tough to apply eyeliner to the top lash line
- Hard to blend with a brush (must use fingertips)

NYX Jumbo Eyeshadow Pencils can be purchased online at www.nyxcosmetics.com or at www.ulta.com.

Jul 11, 2010

Taking Care of Your Sigma (or other brand!) Makeup Brushes

After I did my Sigma brush review last week, I got a lot of great feedback via Twitter and this blog, so a thank you to everyone for sharing their thoughts. I'm glad that so many enjoyed the review! Along with the feedback, I also received a request to write a blog post about how I take care of my Sigma brushes, so I thought I'd share my cleansing routine with you. As always, if you have any additional questions, please let me know!

Why should I  cleanse my brushes?
There are three primary reasons that cleansing your makeup brushes should become second nature:

1) It allows you to achieve the true pigmentation of the products you are using. If you used a peach blush yesterday and are trying to apply a pink blush today, you're going to wind up with a weird mix of both unless you remove the leftover product from the day before. Even though the brush may appear clean, tiny particles get deep into the bristles and might not even be visible if the fibers are black!

2) You extend the life of your brushes AND your makeup. By always using a sanitary, clean brush with your makeup products, you help keep bacteria from infiltrating it. Although makeup exposed to the air will gather bacteria over time regardless (which is why nearly all products have expiration dates or small symbols to show you how long it is safe to keep a product once opened), by only dipping disinfected brushes into your products, you slow this process down a bit. Furthermore, cleansing your brushes extends their lives too, because dirt particles can seep down into the base of your brush and cause it to shed its bristles faster. With a product like a foundation or concealer specifically, the sticky substance can wrap around individual bristles, changing their texture and making the brush less effective in applying product. Finally, lighter colored bristles can even become permanently stained if left dirty for too long! Since Sigma brushes are an investment, you'll want to make them last you for a while!

3) You help prevent breakouts! Every time you use one of your face brushes, you are dusting skin particles, oils and bits of underlying product onto your brush. Every time you re-use that brush without cleansing it, you are taking those old, dirty particles and putting them BACK onto your clean face! That's certainly one way to clog pores and help acne-causing bacteria burrow into your skin.

What is the proper way to cleanse my brushes?
There are many methods that you can use to cleanse your brushes -- it's all about figuring out what works for you! The most widely used method seems to be alternating between spot cleaning and deep cleaning. Spot cleaning is more of a surface-cleaning method that allows brushes to dry and be reused in a short time period. Deep cleaning is exactly that -- a method that really allows you to get out deep-seated dirt, but this requires more drying time and takes longer to do.

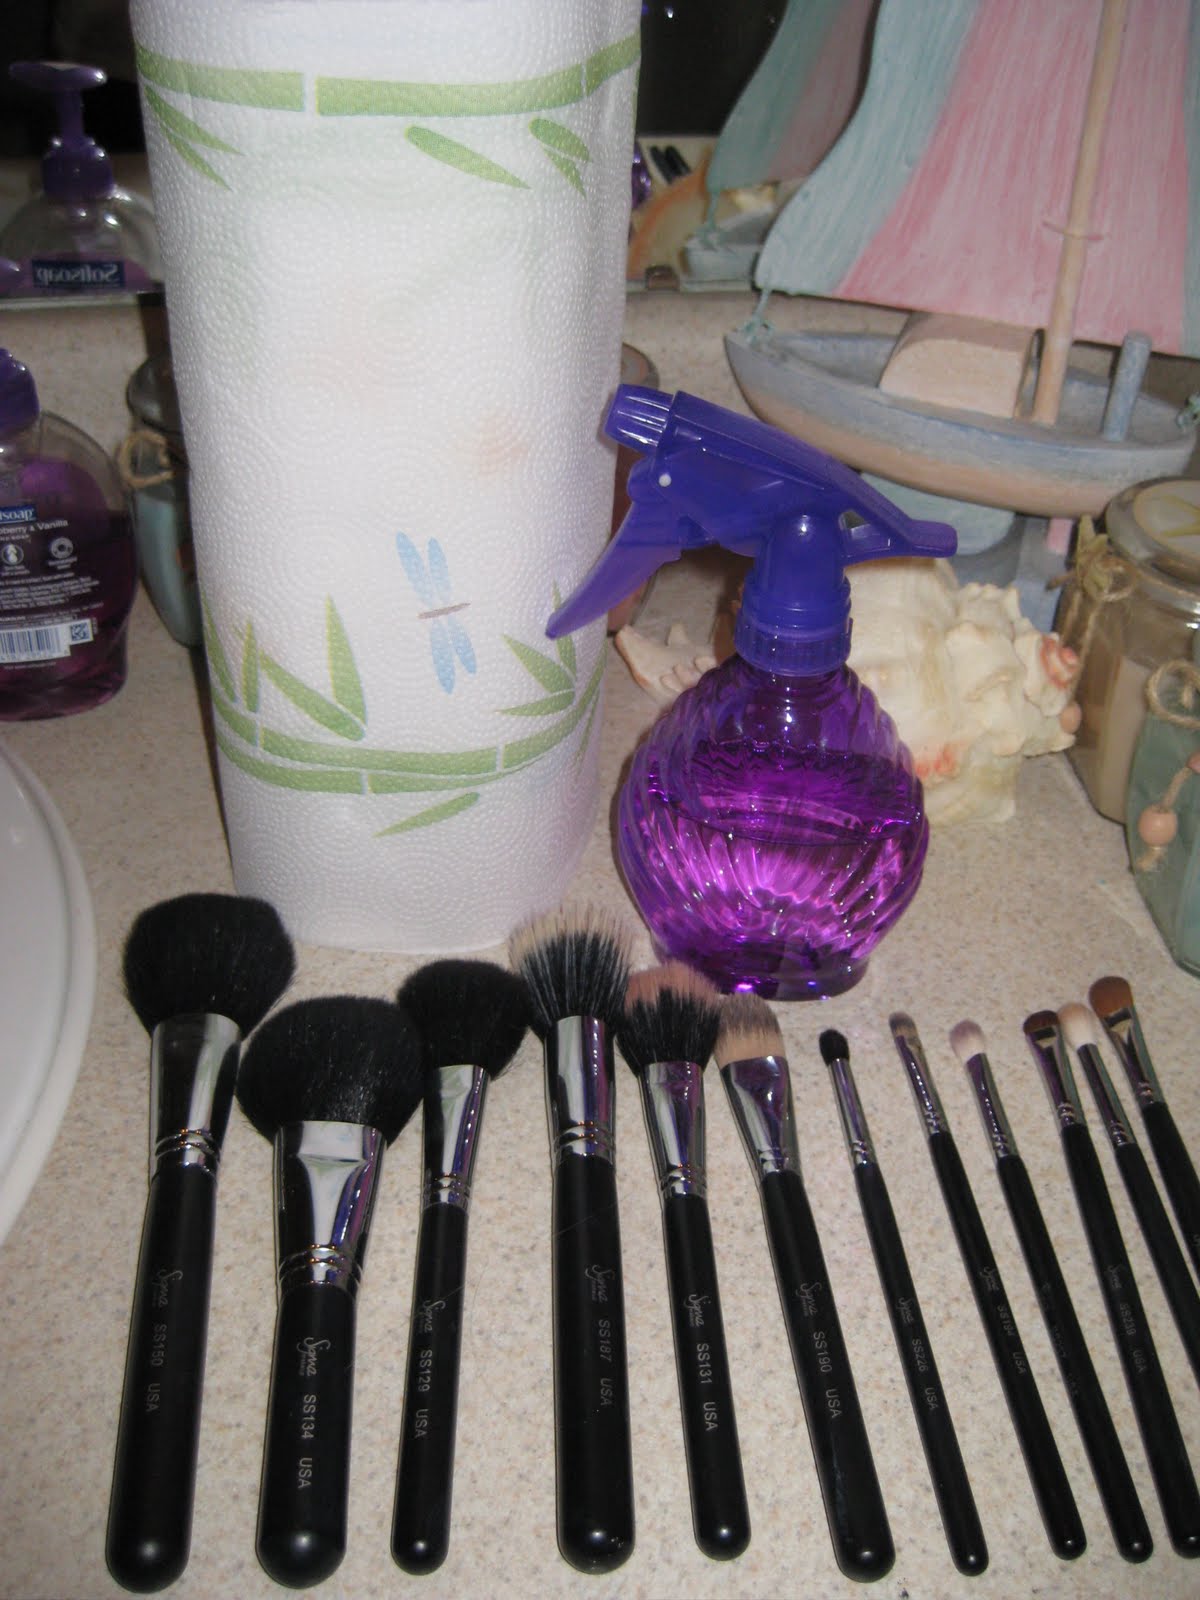
Spot Cleaning: To spot clean you will need a roll of paper towels, your dirty brushes, a brush cleanser of choice (I use MAC's brush cleanser, which is $11 for a big bottle), and a spray bottle (I got mine at CVS for $3). I use a spray bottle to dispense my product because I find that it allows me to use just the right amount without wasting any, which can happen if you just pour the product onto your paper towel.

First, tear off one sheet of paper towel and fold it into quarters. Next, spray the top 2/3 of your brush lightly with brush cleanser, spinning the brush in your hand as you go so that you are coating all sides of the brush. Then lightly rub your brush into the paper towel in a small circular motion, moving your hand around the towel to clean spots as you notice the color coming out of your brush. When swirling your brush results in nothing but clean towel, you know that you are done! With your larger brushes, I sometimes spritz and rub twice to remove all of the color -- as a rule of thumb, if that doesn't get the brush clean, it's probably a sign that your brush is in need of a deep cleaning.

Once your brush is clean, use your fingers to lightly re-shape the bristles and then lay your brush flat to dry. With spot cleaning, the drying process should take only about 5 minutes, and then you are good to put them away or use them again! Generally, I find that I use one side of the quartered paper towel to properly clean my large face brushes, but with smaller eye shadow brushes, I clean several of them on the same side of the towel (just use a clean spot each time). If you want to be more environmentally friendly and prefer not to use paper towels, an old rag or washcloth that is soft can also be used to spot clean. When you're done, you can just toss the rag into your hamper!

Deep Cleaning: To deep clean you will need a roll of paper towels (or an old rag), a gentle shampoo (I use Johnson & Johnson's Baby Shampoo), a sink, and as an option, a clean kitchen sponge. To deep clean, I turn the sink on to lukewarm water and wet the brush, making sure that I don't get any water on the part where the metal meets the wooden handle (if water seeps in here, it can loosen the glue that holds the brush together and cause it to break faster). Once the brush is damp, I place a drop of the shampoo onto the wet kitchen sponge (you can just use the palm of your hand if you prefer) and gently massage the shampoo into the brush until it lathers up. In general, I use an amount proportionate to the brush size, so eye brushes get just a pea-sized dot of shampoo, whereas with larger brushes, I use a quarter-size or half-dollar size. While you are massaging the shampoo into the brush, you should start to notice the color coming to the surface and dripping into the sink. After about 30 seconds, gently rinse your brush under the warm water, squeezing slightly, until the water runs clean. For particularly dense brushes, I generally repeat this process to make sure I've gotten all of the residue out. Once the brush is clean, gently squeeze the water out, reshape the bristles with your fingers and lay the brush flat to dry (again, you want to avoid getting water into the base of the brush!).

Occasionally, air-dried brushes will slightly lose their shape, especially when it comes to larger blush brushes and angled, fluffy brushes. There is a company that sells brush guards that you can use to prevent this (available at http://www.thebrushguard.com/), or you can just watch Dusty Hunter's YouTube video that explains how to solve this issue using the paper towels you already have at home (watch his video here).

How often should I cleanse my brushes?
Generally, I spot clean my eye brushes every day, or every other day at the latest, depending on the use. If I just used my SS224 blending brush to blend out colors (but didn't dip it into any product), I'll wait to clean it until the second day. But other than that, I like to apply different colors every day, so I usually clean off the old product every night so my brushes are ready to go and fresh in the morning. I follow a somewhat similar rule when spot cleaning my face brushes, although here I'm a bit more lenient. I generally clean my blush, bronzer and foundation brushes every 1-2 days, but go a little longer with my powder brush since I use it with the same color every day (I thus clean it about every 3 days).

As for deep cleaning, I do this with my face brushes once a week, because I feel like spot cleaning still leaves a bit of makeup deep inside the brush, whereas I do it about once a month for my eye brushes, as I feel like the spot cleaning does a pretty good job on its own.

I've gotten a few questions as to whether or not cleansing your brushes daily is bad for them, and while I don't know definitively, I think this probably depends on whether you are spot or deep cleaning, and what product you are using. The reason I like MAC's brush cleanser is because it has conditioning treatments as well, so it keeps my brushes soft AND clean. I imagine that daily deep cleaning could dry out your brushes from the sulfates in the shampoo.

After cleansing...
After cleansing, it's up to you how you choose to store your brushes, but I would suggest doing so in some sort of container that is is separate from your makeup, and is in a small space reserved just for your brushes. The reason for the separate storage is so that your clean brushes don't mingle with the small bits of blusher, powder and shadow that inevitably sneak outside of their packaging and can dirty them. The small container reserved just for your brushes (i.e. a brush roll, glass jar, vase, a deep but narrow drawer) will help maintain their shape. For example, if you were to throw your brushes into a drawer with your hairbrush or some other bottles/containers, one of your brushes could wind up getting smushed in a corner or a bottle could get stuck in the bristles, causing them to splay out. Not good! As you'll recall from my initial Sigma brush review, you can purchase a nice faux-leather brush roll from their web site at http://www.sigmamakeup.com/ for $20 (it comes free with the Premium Professional Kit), or you can look for one in Sally Beauty Supply, or any other beauty supply store. Glass jars are obviously easy to find, and can make for a fun crafts project if you have a vanity to display them on!

--
I hope that you enjoyed this simple tutorial! Until next time, here's to clean, beautiful brushes!

Jul 9, 2010

Review: MURAD Acne Body Wash and Clarifying Body Spray


I'll be honest, I hadn't really heard much about Murad until I wandered into ULTA one fine day looking for a body acne cure-all. As I've mentioned, I've suffered from acne on my back and chest for years, and have tried lots of products without results, but I'm so self-conscious about it that I never cease my searching! After the ULTA ladies recommended the Murad Acne Body Wash and Clarifying Body Spray, I went on to the Web site to do some research and found glowing reviews about how this is the one product that cures even the most stubborn body acne. Naturally, despite the price points ($39.50 and $37 respectively), I was sold.

The instructions tell you to begin with the body wash in the shower, rubbing it lightly into acne-prone areas and then rinsing well. The body wash feels like a typical exfoliating product with tiny beads that are supposed to cleanse and tone the skin. The smell is nothing special -- if anything it just smells clean -- and the product rinses without leaving a residue or dry, stripped feeling on the skin. Next, you're supposed to apply the clarifying body spray, which is the "treat and repair" step, 1 to 3 times daily, working with the level of dryness that occurs (both products have Salicylic Acid as their active ingredient, so it does warn that dryness can occur). Interestingly, despite having normal/combination-dry skin, I didn't suffer from intense dryness with this product and was able to use it 3 times a day without flaking or itching. That is certainly a plus! The other plus is that the body spray is designed such that it can be sprayed at angles or upside down, a feature that is supposed to help you reach areas like your back. I was advised that I should start seeing results within a week.

At first, I thought that I was starting to see results on my chest -- several of the large red pimples seemed to dry up and it looked as though there were generally fewer red spots. Unfortunately though, I wound up having trouble applying the products to my back, despite the specially designed bottle. Even though it sprays upside down, you wind up having to hold the bottle fairly close to your body, unless you want to douse your hair, sides and butt with the product too (!!), which means that you wind up getting a fairly concentrated application of the product (i.e. liquidy instead of a true mist), which then runs down your back! I don't mean to get too graphic here, but I certainly don't want the feeling of acne spray running down into my butt, which means that I have to stand there with a towel to catch the run off until the product dries. Very awkward!

Ater a few days, I ceased even trying to apply the product to my back, so I can't really talk to how it affected my acne there. Instead, I just continued applying the product to my chest daily for three weeks. And now comes the negative part. This stuff just did not work. After the initial signs of improvement, everything stalled or reverted! Yes, it did initially cause a few of my spots to go away, but it certainly did nothing to prevent new ones from forming! And even though I do think it helped to a degree, my chest was NEVER ONCE completely free of acne -- I always had at least 10 pimples/spots on my chest, so I still felt just as self-conscious as before, yet now I was $80 poorer. The one other positive thing that I can mention is that for the money, you really do get quite large sizes of the products -- 8.5 fl oz of the body wash and 4.3 fl oz of the spray.

At the end of the day, I wound up bringing the products back to ULTA for an exchange because I felt that for $80 my skin should have been COMPLETELY CLEAR, not just marginally improved. Now, I honestly think I am the first person to write a negative review about this product -- either that or they remove the negative reviews from the Murad web site because I couldn't find a one! It is quite possible that my skin is just extra stubborn and that this would work great on someone else. With that caveat in mind, I continue to suggest, as always, that with expensive products like these, you ask for samples and try them out before indulging in the full size.

And of course, if you have used this product and would like to share your experience (good or bad!) please leave a comment below!

To Recap:

Pros:
- Products have Salicylic Acid as their active ingredients, which is a proven acne-fighter
- The products are large sizes that will last you a long time
- I, personally, didn't notice that this product made my skin excessively dry or irritated
- The spray bottle is designed such that you can spray it while holding it sideways or upside down

Cons:
- It helped my acne marginally, but never completely cleared it up or made a noticeable difference! This is the BIGGEST con.
- The products are VERY expensive at $39.50 and $37 each
- The spray is actually very liquidy, unless you hold it at a far distance from you body, which creates run off
- Salicylic Acid can cause excessive dryness or irritation on some skin types

Murad products are sold online at the company Web site, www.murad.com, or at ULTA stores or online at www.ulta.com.

Jul 8, 2010

Review: NEW! Neutrogena Hydrating Eye Makeup Remover Lotion


I have a love-hate relationship with makeup removers. I love what they do, but I hate the way they feel on my skin! First, there are those oily ones that make your whole face feel greasy as a slab of bacon. Then there are the non-oily ones that, despite being labeled as EYE makeup removers, somehow still manage to burn the crap out of your peepers if the product accidentally seeps in. And of course, I can't leave out the makeup remover wipes that cost more, run out faster, and if you're anything like me, cause your skin to be dry and itchy afterward. Yes, folks, I have tried many-a-makeup remover in my time, and the only one I ever discovered and liked (it was by Nivea) was discontinued several years ago. Alas, to Nivea's detriment, and my benefit, I've found a dupe in Neutrogena's New Hydrating Eye Makeup Remover LOTION.  That's no mistake, this product does indeed have the consistency of a lotion, and after using it for about a week now, I can proudly say it has me in product heaven.

According to the packaging:
"This light, residue-free lotion gently dissolves your hard to remove eye makeup while conditioning your eye area. The unique formula quickly removes makeup -- even waterproof mascara -- yet is gentle enough to use daily. Plus, a replenishing blend of cucumber and aloe extracts helps smooth the look of dry lines and puffiness. Your skin will look clean and refreshed, feel soothed and hydrated."

The packaging also notes that while the product is called an eye makeup remover, it can also be used to remove your facial makeup.

Here's What I Think...
I haven't used this product with waterproof mascara yet, so I can't talk to that claim, AND it's hard to tell if it really affects the puffiness and fine lines since I'm using other products to battle that. BUT, those things aside, I really love everything about this product. Firstly, the product really does have the same consistency of a light, non-greasy lotion -- I just rubbed a dot into my hands and it had absorbed within about 20 seconds and left my skin feeling smooth and residue free. Secondly, you need SO LITTLE of this makeup remover to get the job done, meaning that the 3 oz bottle will last you a LONG time. As a point of reference, I used to need both sides of a cotton ball coated in makeup remover to totally get all the shadow, liner and mascara off one eye. Now I need just one cotton ball for BOTH eyes (one side for each) and I'm using only the tiniest dot of product (about 1/2 of a pea size). Thirdly, this product does NOT sting your eyes, which is always a plus, and the "hydrating" part is subtle enough that I'd even recommend this product for oily skin types. The only downside I can think to mention is that is doesn't have the nicest smell. It's certainly nothing pungent or repulsive, it just doesn't smell particularly great. By no means a reason not to try this product.

I purchased my tube at my local supermarket, so I'd venture to say you could probably find it at a nearby grocer or drugstore. Or, the Neutrogena store online is selling it for $6.99 (which I believe is what I paid, so it's good to know they aren't charging a markup!): http://tinyurl.com/27wm9nt. If you've tried this product, I'd love to hear what you thought of it in the comments section below!

To Recap:

Pros:
- Light, non-greasy formula absorbs quickly and leaves skin feeling smooth without a residue
- Very little product is required to remove eye and face makeup easily and completely
- The product does not burn eyes!
- It's cheap! Just $6.99 for 3 oz of product.
- LOVE the lotion formula!

Cons:
- Smell isn't particularly appealing